Sunday, October 16, 2011

Colour Challenge 142

Well hello everyone.  Yes it's been a while.  It's also been one week since I finished filling in work for a gal on sick leave.  She is back to work and doing great.  I am so thankful for that and I pray her good health continues.  I miss it there already but have plenty of catching up to do around here like...playings cards!!!  I can now participate in some challenges and do some more sharing again.
Here are three cards I made tonight for the colour challenge 142 for the LNS.
Colours are Night of Navy, Cajun Craze, River Rock and any neutral - I chose confetti white instead


A different take on Christmas-at least colour wise!
CASED from a card I received last year


This was a technique we did in class - Frosted Filter
Every background is different and can be dark or light. 
I tried 3 before I stayed with this background
Only the 3 different colours of ink refills were used

This also was CASED. I'm sorry I can't remember who.
I used  a Tim Holtz die for the leaves.


Well I hope you like these cards.  This was a tough one to do.  I'm not real crazy about River Rock but depending on how much other colour you use, will either enhance or detract from each colour. 


Saturday, August 27, 2011

A Rose is a rose more Flower Power

If there's one punch you just HAVE TO HAVE, that's the scallop circle punch.  It has more uses than you can imagine and makes more of the neatest little things!

Ok, so it's fidley...but they're gorgious when done.  Roses from the scalloped circle punch.  Check it out!


I made a sympathy card for a friend at church using the red roses and very similar to the card above but the middle rose was quite large. I used the large scallop die and put it through my cuttlebug...I don't have a big shot yet... and I was pleasantly pleased with the way it turned out.  The other two were smaller but slightly different in size as well. My friend had placed a dozen roses at the funeral of her husband.  I chose three roses to represent the Trinity and the greatest love of all...God's love through Jesus Christ.

I hope you like this one too!

Hellooooooo!

I can't believe I haven't checked in since April.  I'm ashamed of myself!!!  Working full time! UGH!!!  On the bright side, I have now changed all my wooden stamps to cling stamps and have catagorized and catalogued what I own.  Now I have to do all the dies, embossing folders and the other piddlies!

Classes are gearing up to start late September each Thursday evening and I'm sure you will be excited  to see and use the new tools and learn new techniques for card making and scrapbooking. 
I want to share some cards made prior to the summer holidays.
 
Here's a little treat I gave all my ladies at Valentines


Just love chocolate...I mean, who doesn't?


Sunday, April 24, 2011

Tips for storing & catagorizing your stamps

I have so many stamps it's ridiculous.  I can't seem to part with any of them so I need a lot of space for them.
First thing I did was purchase extra clear cases from SU to store the stamps in. 
Second, I removed all the wooden backings from my stamps and turned them into cling mounted stamps.  Not an easy task but worthwhile.
I listed every stamp set I have by name and catagorized them...Christmas, flowers, sentiments, whimsical, juvenile etc.  I did this on an excel file so then I could sort by catagory. 
Then I assigned a number for them.  All my Christmas ones are in the 100's but I also took it one step further by putting more than one stamp set together in the same case.  Both of those sets would be given the same number and the number is placed on the outside spine of the case and placed in my book case like a book.
Every stamp set I own is pictured and placed in my own catalogue and has its own number.
I started with the number 101 and the catagory was backgrounds Take a look at the picture below:

Notice that 3 of the backgrounds have the same number...that's because they are all in the same case.  I highlighted the number in the last set of backgrounds so I know what the last number was used when I go to add more in the backgrounds category.  Now in my catalogue, I have a picture of each set.  The name is listed and beside it is a double box. One side is for the corresponding number so I can go to my bookshelf and find it and the other box is to tell me if it is retired or not.  If it's still available, my ladies know right away and when they become retired all I have to do is fill an "R" in the empty box
Doubling and trippling up the stamps in the cases saves not only space but money because I don't have to buy more cases than needed.
The ladies in class look through my catalogue, pick out what they want to use and go directly to that number on the shelf.
On the top of the spine you can see where I've added the corresponding number.
It's been a long process but a worthwhile and ongoing project.
By the way...I have looked at DVD holders but there just isn't one big enough to hold all my stamps so I used a book shelf with adjustable shelves.

I hope this has helped some of you get organized especially if you're the type who just has to have it all, like me!
Oh ya a couple more things...  I made the list of everything I had first and then I worked from there to make catalogue pages and covers for the cases.  That's why in the first photo you see a column for catalogue and one for cover.  This tells me if I've completed it or not because I'm still working on them.  You can see on the second shelf some of the cases are still clear.  That's because they still need a picture for the case and probably put in my catalogue.
I have a printout list of all the stamps I have with the corresponding numbers even if I don't have a picture available.  This way when someone asks for a stamp by name, I can look it up and go and get it for them.

Happy Stamping
Cathie

Friday, April 22, 2011

Marblize with shaving cream

WOW...talk about about beautiful technique!.  I am soooo impressed with the look of the shaving cream technique and wow does it smell good and feel good to play with.  Yes, a bit messy, but FUN FUN FUN.  Not a single card looks the same.  Similar but completely different.  The use of Whisper White as the background makes the colours POP!  After working with this technique I'd definitely recommend you try it.  To make a nice sea background or water background use a blue coloured paper to give the underwater effect even a more punch of pizazz!.


Cards aren't finished because the sentiment needs to be added.  When I make cards and don't have someone specific in mind that I will be giving it to, I often leave the sentiment off because inevitably, I would need a birthday and all I would have is anniversary or sympathy and then I'd have to start from scratch to make a card.  Completely premade cards are not the greatest when you need something at the last minute.
Here's a couple more.


Have fun experimenting!


Wednesday, March 16, 2011

Brick Wall Technique Tutorial

Hi Ladies,

Thank you for your comments. Love to hear from fellow crafters!
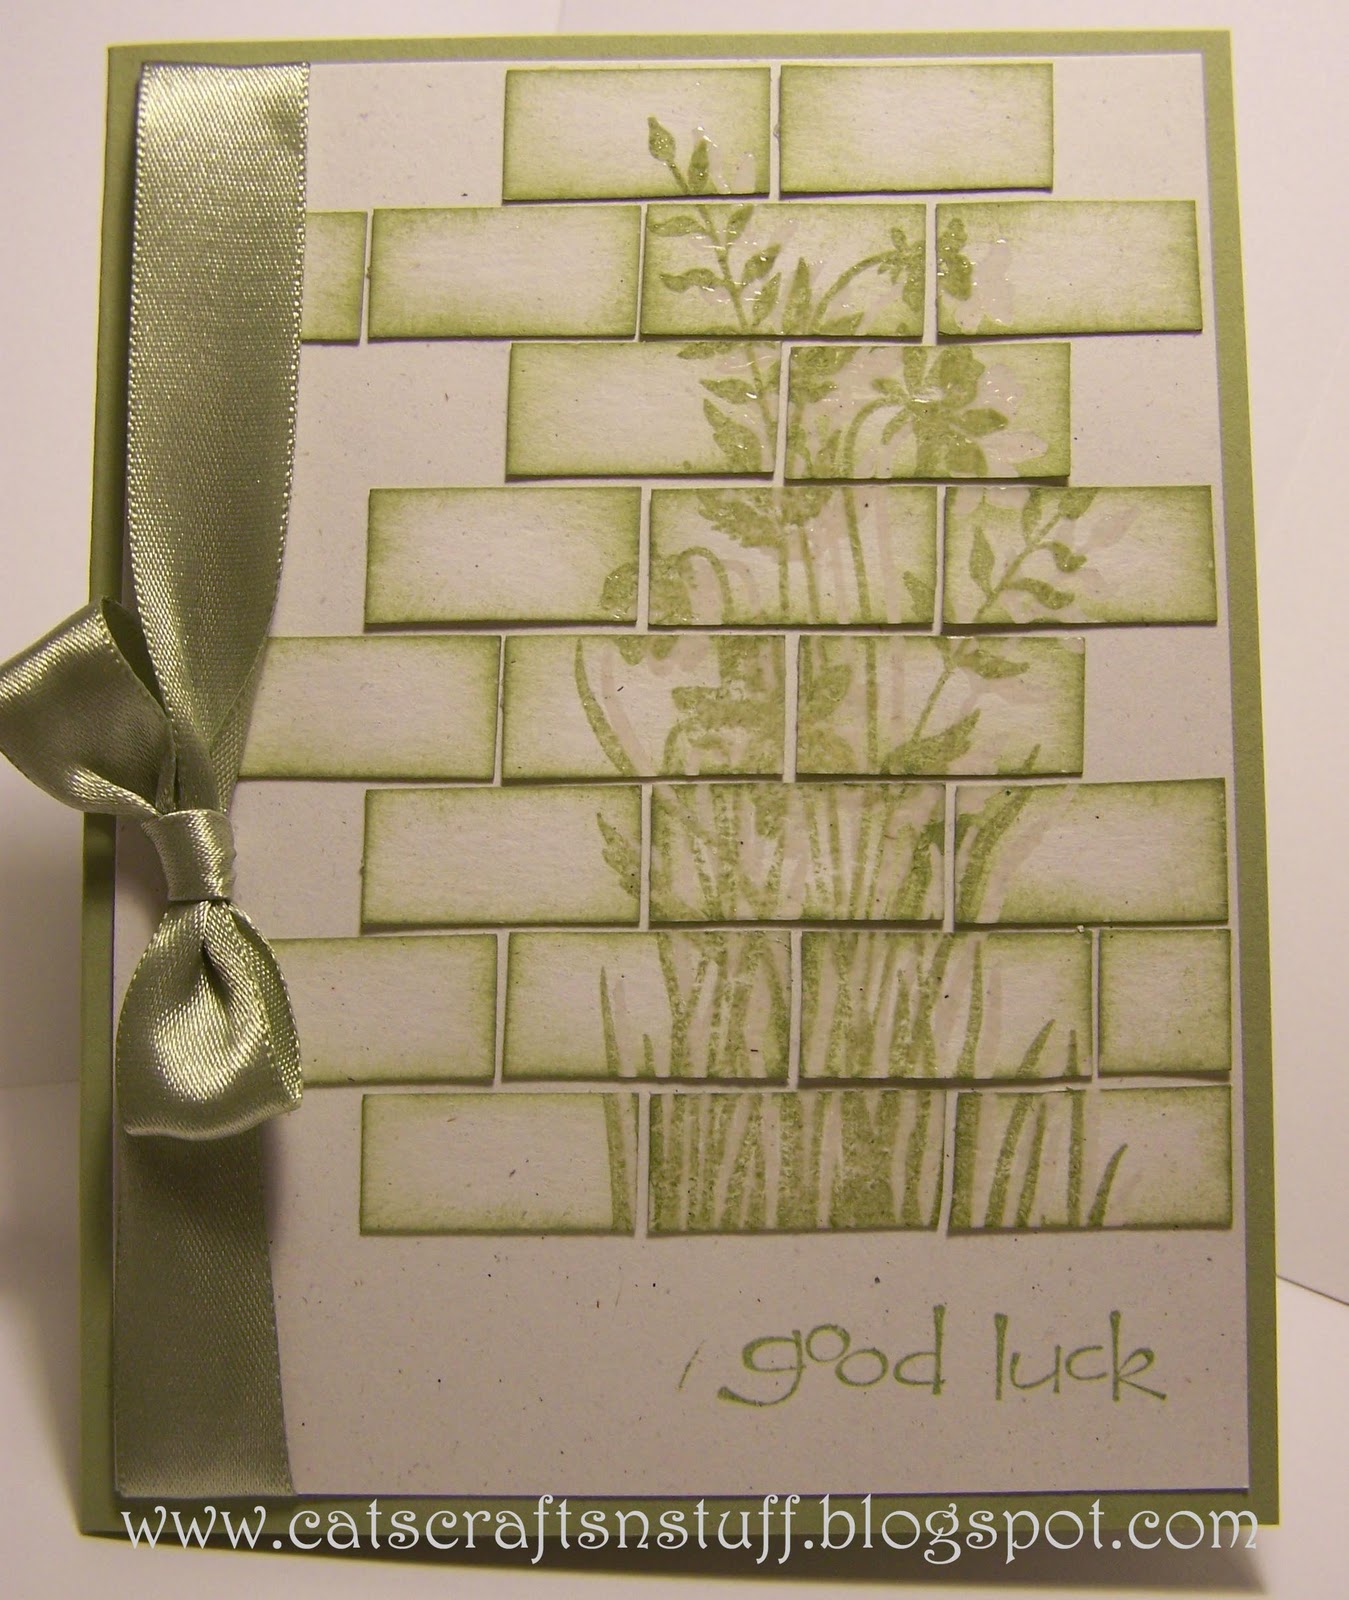
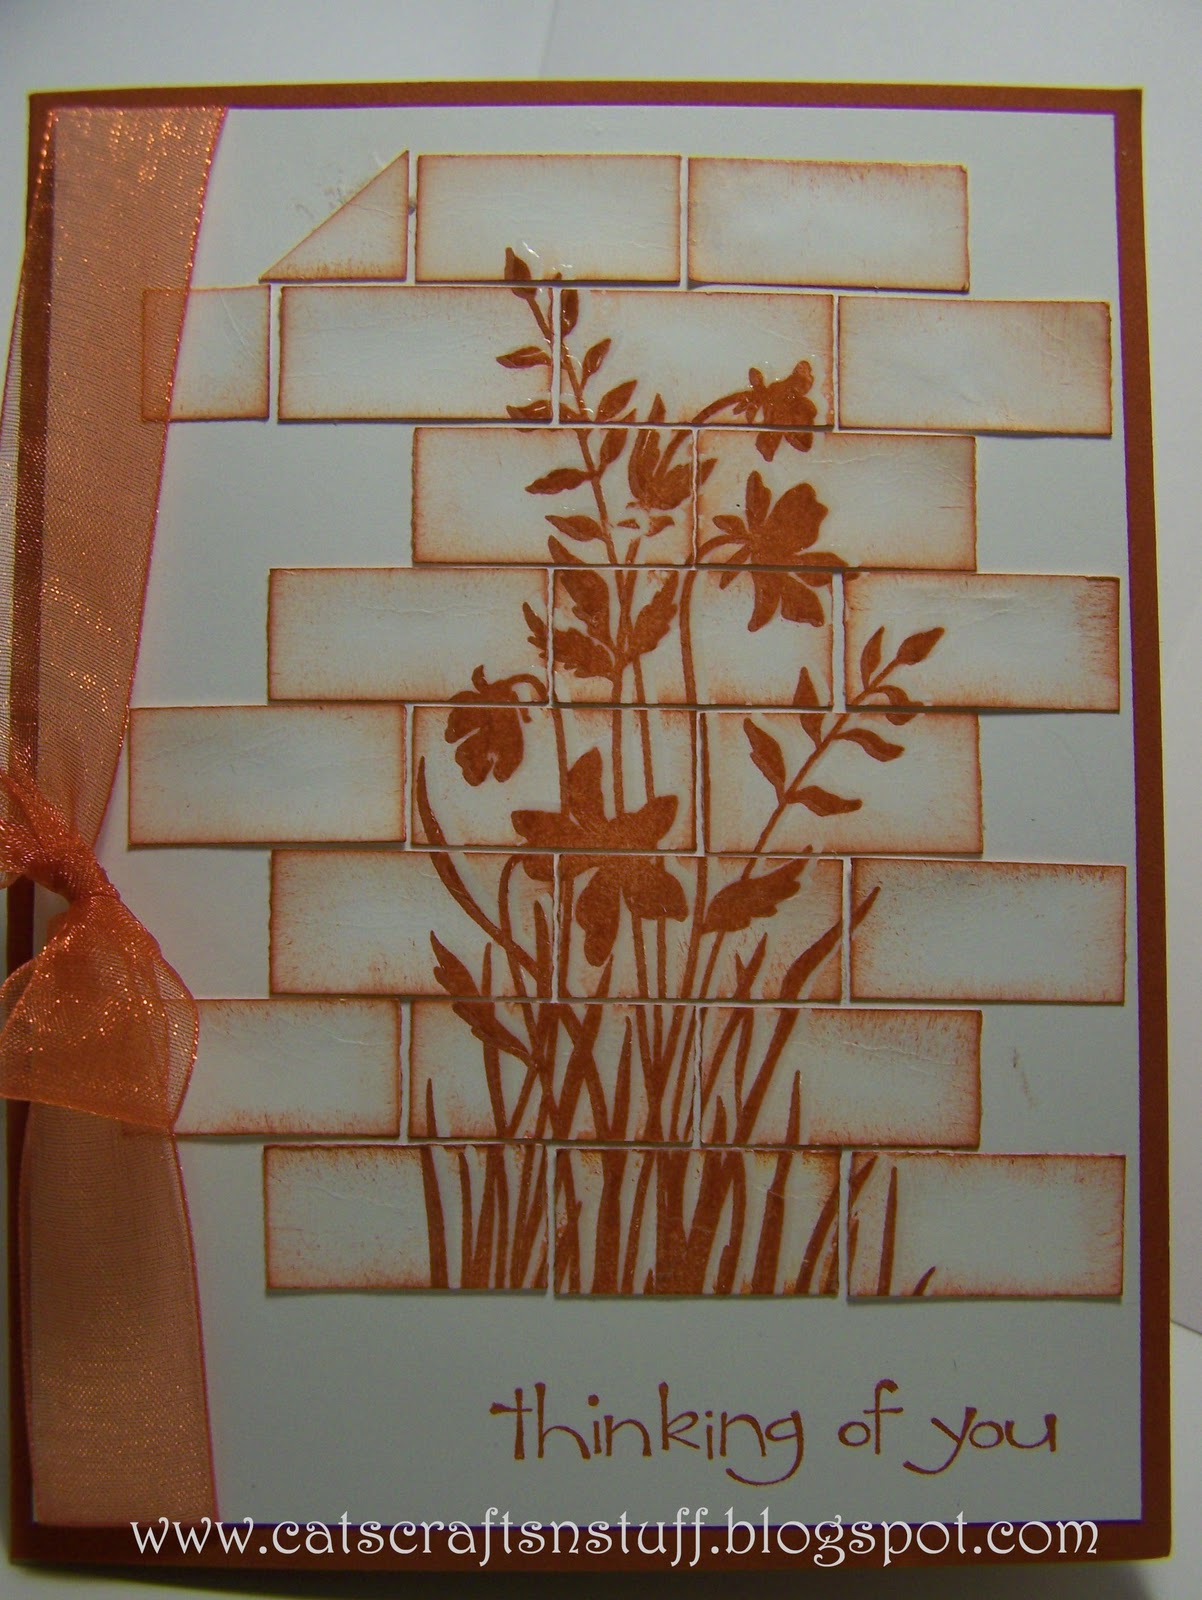
Glad you like the brick wall technique.  It is a great look and easy to do but very fiddly.
I'll do my best to explain:

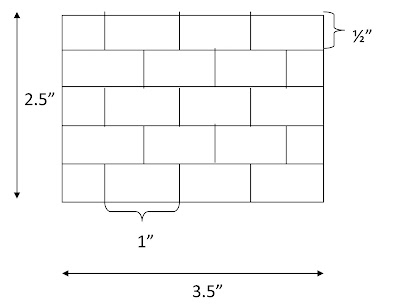
1)  Your sizes need to be in increments full half sizes width wise (1.5", 2.5", 3.5", 4.5"etc.)This is important because you will be drawing and offsetting lines at half inch points
2)  and your height can be in half sizes (1.5", 2", 2.5", 3", 3.5" etc)

The flower cards were 3.5 x 4 (w x h)
The buffalo card was 3.5 x 2.5 (w x h)

3)  Start by drawing lines horizontally on your base moving downward every 1/2". I used Whisper White and also Natural White.
4)  Starting at one corner, lets say, the top right corner...measure to the left 1" and draw a vertical line.  Move leftward again and draw another line at the 2" mark.  Now move left again and draw another vertical line at the 3" mark.  What is left is the small square which is 1/2"
5)  Move down to the next row and start at the 1/2" mark and then mark at 1" intervals 

6)  Stamp your image with classic ink
7)  Restamp with versa mark, adhere clear embossing powder and heat set.
8)  Cut your strips and then brick peices.
9)  Lay them down and in order as you.  Make sure the picture is in order as you do each row
 You will need space to place them down as you go because you don't want to mix the order up
10) Sponge all the edges, one at a time.

Lay your bricks...
for the bison card, the next size to lay(glue) bricks on was 3.75" x 2.75" (Soft Suede)and then the Expresso was 4 x 3
It is a smart idea to place the bricks down first before gluing to make sure you have the right amount of space between each brick and enough outside border.  When you're satisfied, start gluing.
Glue one piece at a time starting in the top right hand corner

On the larger tall flowers card - you can see there are pieces missing from the edges and sides - I decided already which ones I wanted to keep and which ones I didn't but in order to keep things straight and even, I started in the top right hand corner and laid my first brick down with removable adhesive and then all the ones I knew I was going to remove, I laid with removable adhesive. The background card size is 4 x 5.25" and then of course your card size is 4.25 X 5.5"

Splitcoast has a good tutorial should you need more direction.  Or email me  mrssmith58@hotmail.com

Let's see your cards now!

Friday, March 11, 2011

Brick 'O Green

Well ladies, another fun evening and another fidley technique learned.  I am absolutely amazed at the results of this technique and so much can be done using it.  Here are just a few samples.  Love to hear from you and what you think about the cards we make.


Just love this Pear Pizazz and Natural White


How about some Cajun Craze and whisper White!

Here's a great card for that special guy in your life.  The bison/buffalo was stamped using versa mark and then adding clear embossing powder.  It turned out fabulous and took on that 'wet' look in real vision.  Pictures don't really do much justice to the cards!  I used Expresso, Soft Suede and Crumb Cake. Enjoy!

Beefy!

Sunday, March 6, 2011

Flower Power has arrived! Hi Everyone - I'm back!!!

I know... You're all wondering where I've been...NOT...well some of you maybe?  Some of you know that I started an additional day time job just before Christmas.  So at the moment, I really don't have a lot of time to play.  Classes were stopped in January for a while and we have had to cancel a couple of other classes as well already.  No worries...we should be great to go full steam ahead this week again for classes and I'm hoping to get you all caught up to speed with the various cards we've been making since my last blog entry in Nov?, Oct?  any way, I hope you enjoy the cards posted.

We have a new class designation at least once a month called 'flower power'.  These classes are focused on making some kind of flower as an embelishment on a card or a technique to make a flower on or for the card.  The following are some made with the scallop circle punch. CASED of course!


You can add any kind of sentiment to the oval at the bottom right hand corner of the card.  How to create these flowers you ask?
Left: 6 layers of distressed cardstock makes a fabulous full bodied flower.  Scrunch & scrunch and scrunch some more and then separate the paper layers. Join all together with a brad in the middle.  Fluff up to finish!
Right: Single layers folded off centre and petals snipped inward. (snip first straight inward but not reaching the middle) Fold so the petals are offset of each other.

I haven't quite figured out the best way to photograph the cards we make but I am doing the best with what I've got.  If any one has any suggestions or ideas about how to produce better looking photos, drop me a line at mrssmith58@hotmail.com